Familiar with DIY rocket stoves? Sometime ago I wrote a semi coherent rant I called “The Hobo and the Rocket” in which we dove into some tin can stove history and design.
Give it a read to get a little background, or read on…
EUREKA!
I’m not going to tell you that I’m the first guy to have this idea but it just hit me the other day…
So, I was holding a #10 can… You know, the giant cans that are usually filled with something wonderfully obscure and industrial… like butterscotch pudding!
Anyway, my mind always wanders to Rocket Stoves around #10 cans, so I says to myself:
“Look jackass, if you turn it upside down, pop a hole in the lid and on the side there, that’s all you need!”
…and I was right! (but like I said I’m not EVEN trying to own it)
So. Ya. That’s pretty much it. Pop a couple holes in that son of a gun.
One of two tools you will need
WHAT YOU’LL BE NEEDING
Gloves, PPE etc.
Adequately strong tin snips
Can opener
#10 Can or Coffee can
HOW TO BUILD IT
Open the can using the can opener. (Optional step: Binge eat contents)
Remove lid. On the other lid, use the can opener to cut 1/4 to 1/2 way around.
Bend the lid into the can at 45-90°ish angle. This hole is the chimney.
Use tin snips to cut out an opening to preferred size (3″-4″ish square) opposite the chimney on the open end. (This will be the fuel/air intake and your delightful fireside view)
Get a fire roaring and burn out the toxic can lining before cooking with the #10 Stove.
Turn the dial to “11”
THE VERDICT
Shoot, I wish there was more to write, but I think this is it…
The #10 Stoveis simple to build, cheap, and it gets the water boiling fast with just a few handfuls of kindling. Try using a handy dandy firestarter to really get it going!
Construction is much less complex than an insulated rocket stove and the results are just as good, at least on the #10 can size scale.
No extra parts means extra ease if you decide to drag one of these babies out to a favorite secret camp spot or wherever.
While the reality is perhaps a little less dramatic, it’s a damned handy device, providing fire, and at an efficient return for the fuel used. You can feasibly boil a pot of water with this thing using just twigs, sticks and pinecones!
If you are a backyard tinkering type, or are leaning that way, the rocket stove concept can provide many hours of DIY engineering fun, if not just give you something to do.
The feeder stacked to the gills!
The Hobo vs. The Rocket
The Hobo stove has been around at least as long as the steel can, and most likely even longer than that. The concept is simple; an enclosed space, adequate airflow, and a surface on which to cook.
Coffee cans, paint cans, 55-gallon drums… basically anything can be used to construct a “hobo” style design. A charcoal briquette fire starter is essentially the same thing as a hobo stove but with a handle added.
Hobo stoves are far more efficient than a campfire to cook or boil water, and due to the ubiquitousness of the materials, cheap or free to manufacture.
Hobo hybrid burning brightly!
The Rocket stove is defined by it’s “J” shape configuration, consisting of a feeder, burning chamber and vertical chimney. In the 1980s a Dr. Larry Winiarski began developing the Rocket stove based upon other earlier designs, which even included a Roman design known as a hypocaust, which the Romans had used for cooking and heating.
Today rocket stove designs are used in many parts of the world where economic and/or resource limitations make other means impractical or impossible, and I’d say it’s safe to assume that the good ol’ trusty hobo stove is working right along beside it.
Backcountry Use
Hobo Stoves and Rocket stoves can be very handy in backcountry use.
Clearly it would not be practical to hike one of these things in every time you need one. However if you have your own favorite camping spots off the beaten path, especially where available fuel is an issue, a stove like this can be a good idea to cache. (Where caching is permissible)
Note the wispy liner residue. Burn this off!
While gas stoves are awesome, they lack the certain something that a campfire gives. Perhaps it’s the OCD satisfying effect of gathering and adding fuel to a fire, or the ambiance of fire light, the smell, who knows!?
I’m sure though most of us can agree that camping without a campfire, just isn’t 100% camping.
There are a lot of considerations of course: Fire regulations are there for a reason, and for the most part they include this style of stove. One man’s Rocket Stove is another man’s garbage. Be mindful, and be respectful.
I should also mention here that one can build a Dakota Stove out of available materials pretty easily as well, but perhaps I’ll save that blog for another day…
MATERIALS
An assortment of cans
A #10 can or large coffee can (Must be steel, aluminum will melt)
Can opener
A Dremel tool (this makes cutting WAY easier)
An assortment of other steel cans
Tin snips are a good idea as well (and gloves)
PLANS
I’ve experimented with many different configurations of the DIY steel can stove design. Different can sizes, burn chamber/feeder/chimney ratios, top load/side load, and the list goes on…
So I’ve narrowed it down to share with you a couple designs I like best:
Rocket Stove
Hi-tech blueprints
The rocket stove is a side loading, insulated stove. It’s hallmark characteristic is the “J” angle, with the elbow of the “J” serving as the place where fuel and air meet to create fire (Burn chamber). Being insulated, the rocket stove creates high temperatures which result in a more complete burn, and as a result makes very efficient use of a relatively small amount of fuel.
You’ll need a #10 can or large coffee can, an assortment of smaller cans, and a tool with which to cut them. (Dremel)
Cut the top off of the #10 can, leaving the bottom intact.
The other cans we will call “chimney” “burn chamber” and “feeder”. Remove both ends from the feeder and the chimney. Remove only one end from the burn chamber.
Fitting a coconut water can into a “diced tomato” burn chamber
Measure and cut an opening the diameter of your feeder into the side of your #10 and burn chamber. Try to do so in a manner that creates a slight downward angle. Try and make them fit snugly.
To build the chimney you may need at least one other can. Cut the bottom ring off. With the ring removed cut a series of short snips (1/2in±) upward in order to flange the can to fit into the top of the burn chamber. Repeat this as needed (depending the size of your available materials) to bring the top of the chimney close to flush with the top of the #10.
Cut a separate piece of metal from another can and fold it into a rectangle so that it will snugly bisect your feeder tube. This acts as your air intake, if possible make it as long as the feeder/burn chamber is deep.
Use a can opener to punch holes around the top of your chimney, this will allow the hot gases to escape when you put a pot or pan on top to cook.
A jet stove with extended chimney
8. Fit the entire ensemble together snugly and fill the space between the #10 and your “J” with some sort of insulating material. Whatever is handy usually works, dirt, gravel, sand etc.
9.Fire it up! Before you use the rocket stove for cooking, you should give it a good long burn to incinerate all of the can linings. I’m no scientist but I’m willing to bet the plastic lining inside modern cans probably releases some nasty byproducts when heated i.e. dioxins, furans
The Hobo Jet™
The Hobo jet™ is essentially just a rocket stove, but instead of using multiple cans for your burn chamber and chimney, you simply use a single large can. Usually these seem to be industrial size broth cans or juice cans.
More hi tech blueprints
Although I have no real way to empirically measure the performance difference between the two, I’ve come to the conclusion that if you have access to the materials, this is the DIY rocket stove to build. If for nothing else, ease of construction: Less pieces=Less cutting.
Those Dremel blades really start to cost ya if you build a lot of these…
Hobo Jet with smaller top vent
In fact, the only real downside I see is that because the burn chamber/chimney ratio is a little bigger, the Hobo Jet™ requires a bit more fuel, and perhaps doesn’t concentrate the heat the same way that a “tighter” rocket design does.
The Hobo Hybrid™
The Hobo Hybrid™ is my favorite design but…it’s not actually a rocket stove, as it lacks the “J” design. The concept however is similar, and the results comparable.
“Many Bothans died to bring us this information.”
You’ll need a #10 can and a large broth/juice can.
Remove top from the #10 and from the broth can.
Measure diameter of the broth can in the approx. middle of the #10. Punch holes into the bottom of #10 within this circumference.
In the “top” of the broth can (with the lid still intact) you may want to cut a hole in the top, or remove the lid completely (dependent on the size of the cookware you intend to use) Either way, use a can opener to punch holes along the upper edge to allow gases to escape.
Looking into the Hybrid Hobo
Center the broth can inside the #10 and fill in the remaining gap with insulating material.
Burn baby burn! Again, give it a good long burn before using it for cooking to avoid nasty chemical byproducts.
There you go, that’s it. Pretty simple design, and it does the job!
Some inspirational words from Antoine de Saint-Exupéry:
“A designer knows he has achieved perfection not when there is nothing left to add, but when there is nothing left to take away”.
Although it is a top loader, which some people might find disagreeable, I find that ease of construction far outweighs this downside. (If it even can be considered one)
Experiment forever!
If you screw around with the concept long enough, you will most likely come to your own conclusions. Which is part of the beauty of a project like this.
Abandoned design…
Among other design concepts I tried were the”Hobo Jet/ Rocket stove Combo”
Basically this was a Rocket stove with a separate air intake below it. The “J” sat on top of a perforated plate above the separate air chamber (made from an upside down Fancy Feast can)
This I thought would increase the airflow while freeing up space in the feed tube for more fuel, maximizing the concept !
I found that any real gains were negligible at best, and really the whole thing was a lot of work for little or no gain.
Perhaps you can continue down this road, or any number of others and discover for yourself the future of the DIY stove!
My fingertips are tingling as I write this, and no, I don’t need to go see the doctor… but maybe I should start wearing gloves… Nah!
It’s pre-spring here in Western Washington and with it comes one of my favorite forage plants Urtica dioica, the Stinging Nettle.
Anyone who has spent an amount of time tromping about in the woods will have likely encountered nettles, and for some of us that first fateful meeting of bare skin and nettle will be a lifelong memory.
A robust nettle
My childhood lesson in nettles came while we were living in Lake Stevens…. there was a huge tract of forest (now a subdivision) behind the house we lived in and we’d play back there until the cows came home.
One time out there in a stand of alder I encountered the then unfamiliar plant, I paid it no mind until it brushed my arm and then YOWZA!
I remember not being in pain so much as bewildered at what had just happened. Then as the nettle welts appeared, I recall being concerned that they were permanent, and that I’d be deformed for life.
What was this fierce plant?
Well, the nettle got me that day but now the tables have turned….
IDENTIFICATION
The point is, your first experience with nettles is likely to make a lasting impression, often negative. However this is a blessing in disguise for the budding forager…
If you are the type that worries about harvesting a “DEADLY LOOK-ALIKE” then you couldn’t ask for a better plant to start with, nothing stings like a nettle, least nothing around here, so if it stings, you’re safe!
Leaving the lower leaves
Aside from the stinging, nettles are a fairly innocuous looking green plant, with teardrop shaped, jaggedly toothed leaves, bearing a slight resemblance to mint maybe.
Later as they become older and begin to flower, nettles become lanky and spent looking, with these hanging clusters of ball-looking things, which are actually the flowers. When I was a kid I mistakenly thought it was these clusters that delivered the sting. (I decided further investigation wasn’t necessary)
In winter, nettles will have long died, however you can still nettle hunt by looking for the remaining nettle stalks. They are up to about three or four feet tall, and often sort of mottled black/white. This is a good way to mentally note hunting grounds for the coming spring.
“THE STING”
No, not the Paul Newman/ Robert Redford flick (though I love that soundtrack) I’m referring to the “sting that puts the “stinging” in Stinging Nettles.
Most of the nettle plant is covered by very fine, hollow hairs that break off and imbed themselves in your skin upon contact.
The sting you feel is the result of a complex concoction consisting of chemicals that most of us do not recognize, nor can pronounce.
Snipping the leaf
Luckily, the resultant sting and (occasionally accompanying) welts are temporary, and will not cause permanent disfigurement or discomfort.
(That being said, I’ve had tingling in my fingers for days after a big harvest, then again I don’t use gloves)
There are many folk remedies for mitigating the sting, I can’t vouch for any as I’ve never tried them, however, if you can’t handle the sting, perhaps you should reconsider harvesting stinging plants.
Friendly food for thought!
USES
Stinging Nettles are loaded with vitamins and minerals, in fact just one cup of steamed nettles will provide 555% of your daily vitamin K!
Nettles are also used medicinally, and something of a panacea.
Just look up Stinging Nettle and medicine or herbal or something like that and you’ll see what I mean.
Extolled benefits include helping the liver, the kidneys, the cardiovascular system, the prostate, and so on and so on!
Nettle skeletons!
It’s wide array of benefits are lauded so much that it almost sounds like old-time snake-oil. (Who knows, could have been a key ingredient)
Historically nettle fabric was widely used as rope, sail cloth and clothing among other things.
Industrially it is not used so much these days, but if you are so interested, it can be spun into yarn, and might make for a fun project for the textile-inclined.
Nettles have been used as a hair tonic as well. (Perhaps even halting or reversing baldness… but I don’t buy it)
COOKING
While it’s uses are wide and perhaps wider than I’ve mentioned here, personally use nettle most often for food and tea.
Cooking nettles neutralizes it’s sting, and only after a very short time, 30 seconds perhaps. If you are apprehensive, just try and sting yourself with it before you stick it in your mouth.
More often than not, I steam nettles and pack them into freezer bags for future use.
Cleanliness is next to Goodliness!
I really enjoy eating them like cooked spinach, with a little Parmesan cheese sprinkled on top.
A new favorite trick is to chop them really fine with a Cuisinart and add them to soups. My split pea/nettle soup is especially good, as the nettle imparts a slightly sweet earthy taste which really melds well with the peas and other ingredients.
I was thinking of juicing some cooked nettles as well!
Nettle tea is another favorite, and I find it has an almost “magic” way of warming the body and soul on a winter day.
Nettle tea is pretty good on it’s own, in addition to earthy and slightly sweet I’d describe it as green, very green.
Various wild harvest teas
It can be easily blended with many other teas too, as it’s flavor melds well, never being too overpowering.
Many of the medicinal benefits of nettle can be imparted in tea form.
To make the tea, simply dry the leaves, don’t worry, drying also neutralizes the sting. I find this is easiest in a dehydrator, but on a cookie sheet in an oven at it’s lowest setting is another option.
You may also be able to just air dry, either by spreading the leaves out, or by hanging the whole stalk up, and crumbling the leaves off when dessicated.
HARVESTING
To glove or not to glove, is it even a question?
When I first started nettling many many years ago, I always wore gloves. Then at some point after being stung for the thousandth time, I gave them up.
Going back to uses, I forgot to mention self-flagellation, more specifically known as urtication. (From Urtica, yeah, latin, you see what they did there?) This is an old folk/Native American technique to treat rheumatism, er, take ones mind off of rheumatism rather.
I always thought it sounded crazy, I mean who in the hell would whip themselves with nettles? Well, as it so happens after working without gloves for so long now I can honestly say, “I can see that”
Steaming!
After getting used to the sting, and sort of accepting it, it’s not so bad. In fact after the sting starts to “mature” it actually does seem to have a sort of numbing quality, or maybe I’ve just gone nettle crazy.
They will sting through fabric
Anyway, gloves or none, it’s your choice.
Nettles intended as tea or food should be harvested while they are young. Usually this means less than a foot tall or so. Some people will harvest up until just before the bloom, but generally the younger the better.
After they are over a foot tall or thereabouts, and begin to go into flower, they produce cystoliths (mineral deposits) in the leaves which it is said, can be irritating to the kidneys and gastrointestinal tract.
Last years nettle stalks
So far as eating or drinking, it might be best to err on the side of caution here, however nettles at this stage can still be used for other purposes such as fiber or as a hair tonic. Read deeply and experiment broadly!
I usually go out harvesting armed with a pair of scissors and a bag. Simple as that.
I find it is best to cut the nettle cleanly, leaving a few sets of leaves below the cut so that the plant may continue to grow.
Make sure to look over the plant good, save yourself the trouble of excessive cleaning by omitting infested, or overly filthy plants from your picking bag.
Steamed nettles!
I usually process my nettles while in the field, finding myself a good place to rest my butt while I overlook the leaves and snip them into a bag, leaving something of a nettle skeleton midden as proof I was there.
If you wanted to try and do something with the fiber however, you should hang onto the skeletons.
I have also brought home nettles, stalk and all, for hanging to dry for tea. This can even be sort of decorative if you are into that neo-hippie/old timey look.
ETC.
Only once has someone ever advised me “Don’t harvest the whole plant and leave some of the nettles behind”, which is in stark contrast to the vast majority of passersby who suggested I use RoundUp rather than weed by hand.
Frozen Nettles!
Here in Washington State the nettle is a native plant and should not be treated like an invasive weed, so despite what the public consensus is regarding nettles, bear in mind conservation.
Also know the rules regarding where you harvest, some areas are a free for all, while other areas such as Ravensdale Retreat or McGarvey Park are Natural Areas in which foraging is forbidden.
When on USFS land a collection permit is required for non-timber vegetative products taken over “incidental” amounts, which is a little ambiguous, read more at http://www.fs.fed.us/
Anyway, there is much more to nettles than I have touched on here so again I encourage you to read deeply and experiment broadly,
It’s that magical time of year when people start stampeding over one another for the best deal on the latest Elmo and our brains are constantly bombarded with the same Christmas songs we’ve heard since time began.
In case you weren’t sure where you were
Christmas tree nomads take the place their firework brethren stood only months before as the cosmic ballet of hawking holiday cheer marches on.
It’s Christmas!
Living here in Washington, it’s always perplexed me why anyone would go and buy a tree. I mean take a look around you. (Unless you live on the dry side)
“This be bumpkin country”
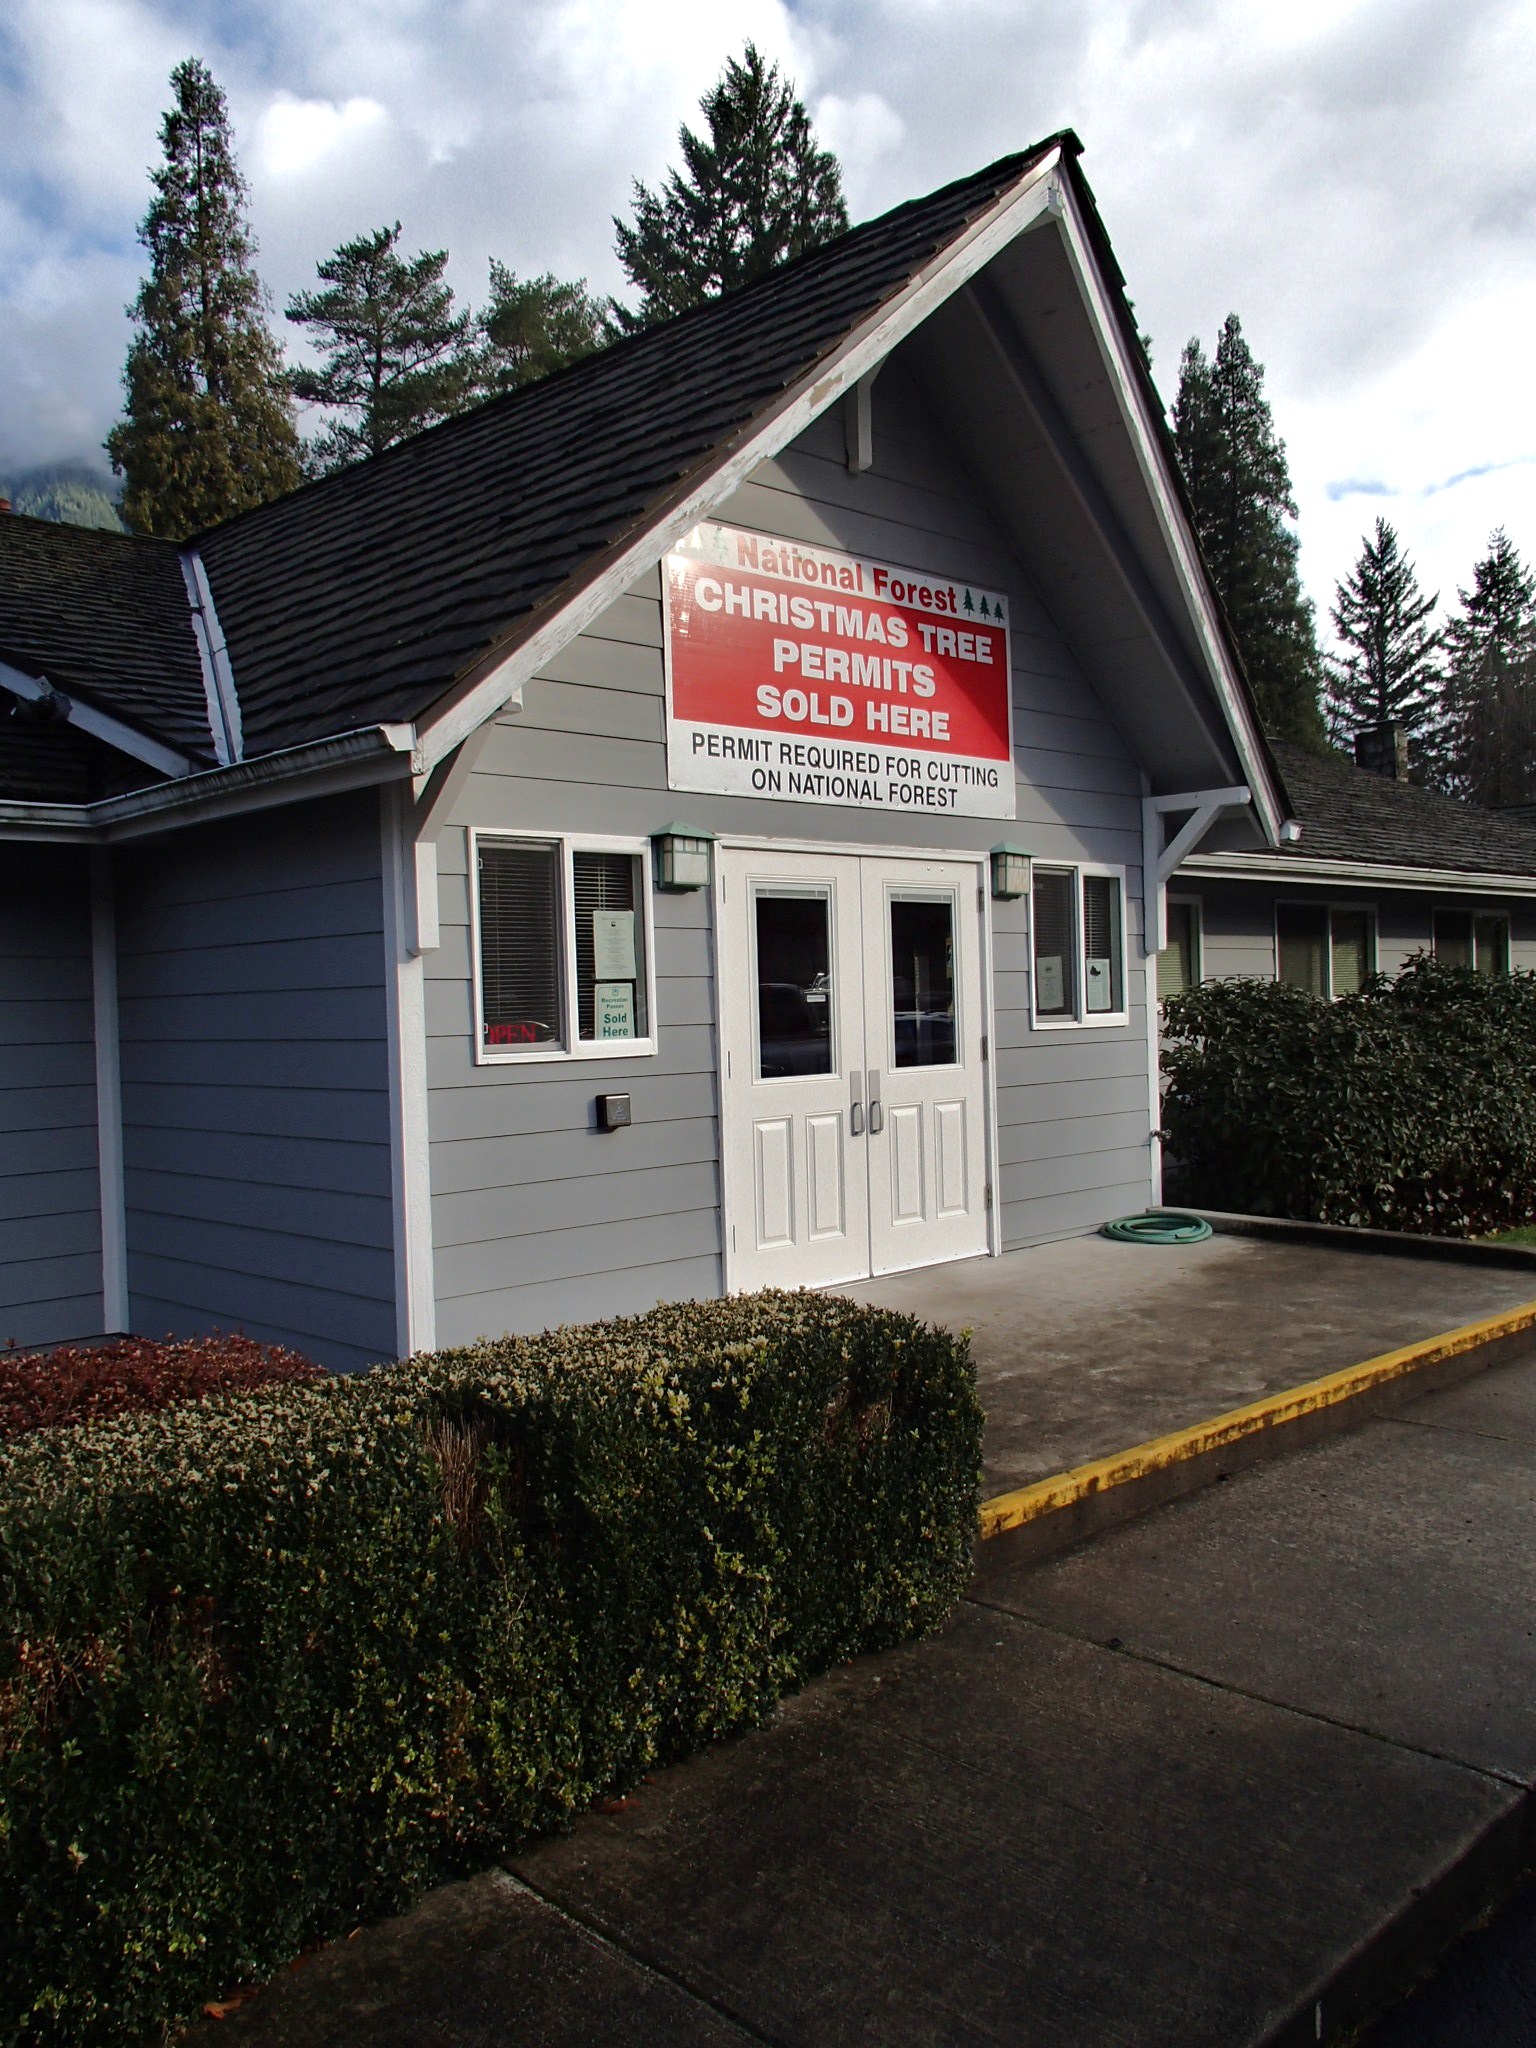
Maybe people buy farm trees because they don’t know that you can buy a tree permit for like $10 from the Forest Service.
It varies in price depending on where you intend to cut or how tall of a tree you want to harvest. Anyway you chop it (lol), it’s a hell of a deal.
In the Mt.Baker-Snoqualmie National forest, a permit for a tree under 12′ tall is only $10.(DEC2014)
Only $20 if you have vaulted ceilings the likes of the Mercer Island crowd and need somethin’ a little taller…
Permits are available for sale at the local Ranger station or at a handful of fine retailers. (REI sells them)
Day-Glo permit
Once you have your map and permit it’s time to go hunting.
Important things to equip yourself with:
1. Weather appropriate clothing.
2. Work gloves.
3. A saw (I’d suggest a bow saw, but I’m not going to tell you how to do your job)
4. Ample rope to secure your tree to your vehicles roof.
5. Emergency supplies; i.e. shovel, chains, extra food emergency blanket etc.
Adverse road conditions, but so pretty
Depending on the weather and/or type of year we are having, you may experience snow in the high grounds, so be prepared.
This is especially true if you intend to bag the elusive Noble Fir.
A Christmas tree hunt can be whatever you make it:
Establish a base camp, snowshoe for days, cut down the tree with your teeth!!!
…or you can just drive around til you find it.
The map will tell you where you can harvest, so having it is vital.
It doesn’t mention however that you may not cut a tree within 150′ of streams, ponds, lakes or wetlands.
Knowing is half the battle.
♪♫I’m a lumberjack, and I’m ok♪♫
When you finally find and cut your perfect tree whether it be Yggdrasil or the Charlie Brown Christmas tree, you gotta attach your permit prior to transport. The forest service generously supplies a zip tie!
Properly fastened and punched permit
Make sure to punch out the correct date on your permit and you are good to go!
All that’s left is to securely fasten your tree to your vehicle or mule team, ox, whatever you got.
I’m no knot master, so all I’ll say here is make sure that baby can’t come flying off.
Do a good pre-freeway or highway check. No need to cause anymore undue Christmas casualties.
Better do a brake check!
Not a bad idea to inspect your tree for small mammals or bee’s nests while you are at it.
I’ll tell you, not a lot sucks more than trying to get a fire started on a cold, wet day. Your boots are soaked, been practically drowning in chest deep undergrowth and you’d have an easier time setting fire to a waterlogged NERF football than getting any of the kindling around camp to burn. Yeah…things could be better, and they will be because you got a bic and a couple of these babies in the bag!
Melting the candle
First lets start with the tools you’ll need; Pinecones, wax, egg cartons, a pot, and some source of fire and or heat.
Pinecones are easy enough to come by, any will work but I find Douglas fir cones fit in the egg cartons the best. Try and find cones that have the scales open, and most importantly, are very dry.
Egg cartons can be tricky if you don’t eat many eggs. If you’re not above it though, they can be very abundant in your neighbors recycle bins on trash day. Small paper cups or something similar would also work.
You’ll want a pot that you’ll never intend to use for any other purpose, because this project will essentially render it useless for anything else (unless you like waxy food or scrubbing pots) I made a visit to the thrift store for this one. $0.99 baby!
Wax can also be acquired cheaply at thrift stores. Every thrift store has a shitty candle section somewhere inside, some rack populated by giant, gaudy wickless abominations that have transcended time and space. Go for size and price here, you won’t need the wick. Plain old parrafin is available at some grocery and craft stores as well. (But lacks that musty 70s candle aroma)
Melted wax is poured onto the pinecones
Lastly, heat. You could feasibly do this inside on your stovetop, but I wouldn’t recommend it unless you have no regard for nice stuff, oh and there is the little issue of potential fire hazard. I just fired up the old whisperlite out in the backyard. You might look like you’re cooking up a batch of meth, but who cares, at this point the neighbors have seen you digging through their trash for egg cartons, you’re already on their freak list.
Now that you have your tools, the rest is pretty intuitive, though I’ll walk you through just in case it’s not.
Take your pinecones and stick them into your egg cartons, I put them in stem side down for a nice, snug fit.
Now let’s get your wax melting! First off, remove any stickers that may be on your candle, sometimes they hide one on the bottom. Don’t worry about doing anything with the wick.
Using my camp stove, the pot gets pretty hot pretty quick and the wax will start smoking some. Don’t be alarmed, this is normal (or so I think) however, at this point with the open flame is your greatest chance for a fiery accident. Probably best not to do this in the dry grass or around otherwise flammable things.
As the melt gets underway you might notice that the volume of wax contained in your musty 70s candle is too great for your thrift store pot, don’t panic, just take it off from heat before your pot runneth over. If you’re doing this on the stovetop, try a nice leisurely melt on just under medium heat to avoid many of these problems and to mitigate the risk of burning your house down.
Fun size!The cuttin’
When you have your wax all melted, just pour it over your pinecones and let set. Wax is going to get everywhere unless you got a pretty steady hand, needless to say, put down a newspaper or something.
Voila! waterproof fire starters!
After they’ve hardened I cut them up into individual units and carry some along everytime I head out into the woods.
Alternatively, you could cut them up beforehand and use a pair of tongs or something to dip them into the wax, it’d result in a more even coating, but requires more work and patience than I usually care to devote to something I’m going to set on fire anyway.
With that being said, only one thing left to do….Flame on!